Wicker Patterns
After several people asked how I made the wicker fills for my wicker furniture tutorials, I decided to show you how I created most of mine. I used PSP and free plugins. I'm also adding a bit more detail on changing your wicker pattern to white for those who had trouble doing it on their own.

Sources
If you don't have them already, you will need to download the free Redfield Plugins which include the free versions of Jama 3D and Lattice Composer. (They come bundled together in one download.)
Optional: Free MuRa's Perspective Tiling plugin.

- Open a new transparent image. Size is your choice. (However, since these won't be seamless patterns, you may want to have a 350x350 square image.)
- Flood
 layer with your color choice.(Any colors except black, white or gray.)
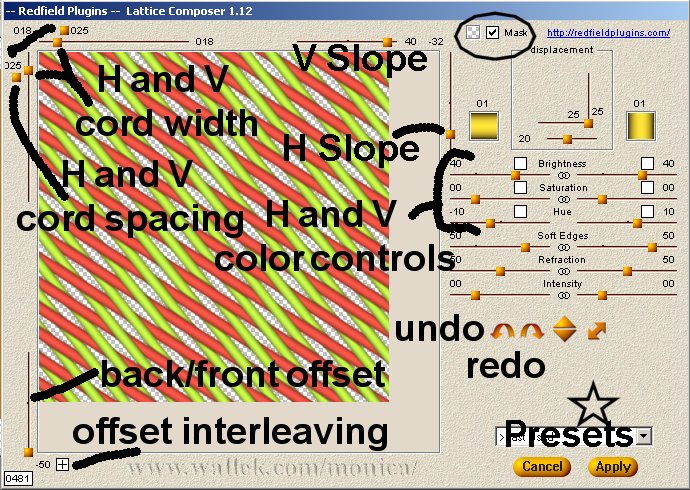
 - You'll need to click on Effects->Plugins and find the Lattice Composer plugin.
- Choose one of the following Presets: Weave2, Weave3, Weave4, Crosshatched, Mashberry, or Wallen Tiles. (Choose whichever look you like.) Note: Make sure on your window that the circled area on mine matches yours. The area appears for certain presets only. I went ahead and labelled the items for you, but you can mouseover the controls yourself to read the functions of every tool.

- Apply the preset.
- While we're here, let's go through the steps to change the pattern color from whatever you chose to white. Save your pattern if you like it. Make a copy using Shift-D.
- Click on Colors- >Colorize. Make sure your numbers are set to 0,0. That turns the image into a 16.7 million color grayscale image in one step. (I like to save the pattern here, too. I have a grayscale pattern ready to Colorize.)
- Click on Colors->Adjust->Gamma Correction. Make sure the "link" box is checked and slide the slider to the right to lighten the image. (Sliding to the left darkens the image.) I chose 2.30.
- But your image isn't white, is it? Repeat step 8 until you like the shade of white you get. I usually repeat this step at least 3 times, depending on the pattern.
- Save your new white wicker pattern.
- You can make more complex patterns by applying the Jama 3D filter before you apply Lattice Composer.
- Go ahead and open a new blank image as before.
- Flood fill with a color you like.
- Open the Jama 3D plugin. I chose the Cellulary preset. Doesn't look anything like a weave pattern, does it?
- Now, open the Lattice Composer plugin. I chose Wallen Tiles. Feel free to experiment with other presets.
- For those curious souls wondering how I made the wicker seat patterns have perspective, it's just another free plugin.
- I opened MuRa's Filter Meister Perspective Tiling and used the default settings to create the look.
- I've been experimenting in Lattice Composer by moving the sliders around. I have already saved quite a few of my own settings in there. In the title image, the middle strip of wicker is the only default setting I used. The other two patterns I created messing with the settings of a default pattern.


PSP7 tool icons are from MaMaT's icon tubes.
"PSP" refers to
CorelTM Paint ShopTM Pro®.
The individual creators own the copyrights and/or trademarks on their respective software filters, fonts, presets, Quick Guides, scripts, magazines, and images/banners which are mentioned or appear on these pages.
Customizable layout provided by Blue Robot CSS layouts. Note that I changed the colors, background and customized the CSS for my site.
© Copyright 2001-2011, Monica Wallek, All rights reserved.
Using my tutorial, means you agreed to these usage terms. All page elements, tutorials, and explanatory and sample graphics belong to me except where otherwise noted.
