Country Barn
This tutorial grants the wish of BarbH. She was wishing for a country tutorial. I created this lesson from a photo I took of a barn on a relative's land. Since I have lots of cousins, the real location should be protected. (Smiling.) While this tutorial was created with vectors, I do provide the selections for you to fill. For the curious, 42 vector lines and 64 vector rectangles were used to create the image. Thanks Ronni! If you hadn't written all those building tutorials, I would have no clue how to write this lesson.
Please keep in mind that this file will get large. You may find it helpful to clear out your PSP Cache file and keep your clipboard and command history empty. Save often. For some selections, you may find it easier to use the Brush ![]() tool rather than the Flood
tool rather than the Flood ![]() tool.
tool.

Sources
You will need these supplies.

- Open a new, 714x358 transparent 16.7 million color image.
- Add a new layer, Inside. Selections->Load Selection the 01 inside.sel file. Flood Fill with black. Select None.
- Add new layer, Right Wall. Load 02 right wall.sel file. Open my r wall.psp file. Copy it and paste it into the selection. Select None.
- Add new layer, Right Shadow. Load 03 r shadow.sel file. Flood fill with black. Select None. Apply Motion Blur: angle= 122 and 12 pixels. Set layer opacity to 60%.
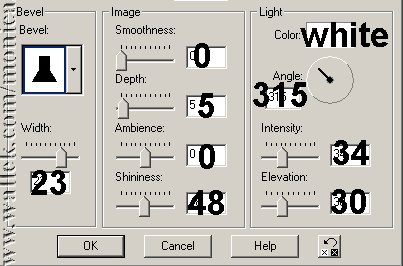
- Add new layer, Inner Supports. Load 04 inner supports.sel file. Flood fill with the Jasc Driftwood pattern fill as shown. Apply the inner bevel shown. Select None.


- Add new layer, Floor. Load 05 floor.sel file. Open my floor.psp Copy it and paste it into the selection. Select None.
- Add new layer, Floor Edge. Load 06 floor edge.sel file. Flood fill with Driftwood Pattern, but set angle to 90. Apply same bevel. Select None.
- Add new layer, Vertical Boards. Load 07 vertical boards.sel file and fill with same pattern at angel 90. Select None.
- Add new layer, H Fence. Load 08 h fence.sel file. Fill with same pattern angle set to 0. Select None.
- Add new layer, V Fence. Load 09 v fence.sel file. Fill with same pattern set back to 90. Add same bevel. Select None.
- Add new layer, Tear. Load 10 tear.sel file. Fill with same pattern at angle 90 and add same bevel. Select None.
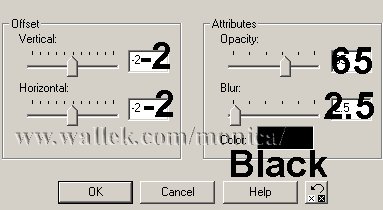
- Add new layer, Roof. Load 11 roof.sel file. Fill with same pattern at angle 0. Invert your selection, and apply drop shadow shown. Select None.

- Add new layer, Fallen. Load 12 fallen.sel file. File with same pattern at angle 0. Do not invert! Apply the same drop shadow. Select None.
- Add the last layer, Details. Load the 07 vertical boards.sel file. Now using the light and dark colors in the colors.psp file, and the air brush settings shown, dab on some extra color on the boards. I'll leave the exact placement up to you. When you have finished, apply Motion Blur with values of 172, 16. Select None. Then lower opacity of that layer to 55%. Move this layer to just above your Vertical Boards layer.


- You can save your barn and add it to a scene you choose.


PSP7 tool icons are from MaMaT's icon tubes.
"PSP" refers to
CorelTM Paint ShopTM Pro®.
The individual creators own the copyrights and/or trademarks on their respective software filters, fonts, presets, Quick Guides, scripts, magazines, and images/banners which are mentioned or appear on these pages.
Customizable layout provided by Blue Robot CSS layouts. Note that I changed the colors, background and customized the CSS for my site.
© Copyright 2001-2011, Monica Wallek, All rights reserved.
Using my tutorial, means you agreed to these usage terms. All page elements, tutorials, and explanatory and sample graphics belong to me except where otherwise noted.
