|

Picnic Ants in PSP7 and PSP8

|
What is a picnic without ants? Probably a relief, but few people are familiar with that type of picnic.
You'll be creating a single ant using vectors. No node editing, but you will be moving, copying, pasting
and rotating individual vector parts. You'll be able to save the copy of your finished ant shape as a
preset shape for future repeat usage. The directions included will work for the two most recent
versions of PSP. (PSP6 has limited vector support.)You should already be familiar with the shape, line,
and vector layers tools in your version of PSP.
[This tutorial will not go into enough detail on these tools for first-time users.]

Sources
You'll need version 7 or 8 of Jasc's Paint Shop Pro.
No outside filters needed.

- Open a new 450 x 450, 16 million color transparent image.
- Choose the Ellipse vector shape, create as vector
checked, antalias checked, retain style unchecked.
- Set your foreground color to null and your
background color to black.
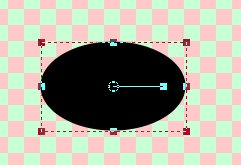
- Now, we'll be drawing an ellipse which will become
the form for the head, middle and lower body later.
Draw out your ellipse. An oval shape is perfect!

- Now, rename your ellipse "Head".
- You'll get a break from drawing here now, just lots
of copying and pasting.
- Select the Head. Copy and paste it to the same
vector layer twice.
- Rename one copy to "Middle".
- Rename the other copy to "Lower".
- Adjust the Middle as shown with the vector selector tool.

- Adjust the Lower body as shown.

- Rearrange the Head, Middle, Lower layers as shown.

- Group them and name them "Ant Body".
- Ready for a bit of drawing?
Set foreground to black and background to null.
Draw a 8.0 wide vector line as shown and rename it "Leg".

- Copy and paste your Leg two times.
- Group all 3 legs and rename the group "right legs".
- Copy the Right leg group.
Paste on a NEW vector layer.
Rename "left legs".
- Image->Mirror.
- You'll need to carefully align the left legs across from
the right legs.
- Move the left legs back into the vector layer containing
your other legs.
- Ready for the last line drawing?
I used the same line settings as for the legs.
Draw out a slightly curved line for the antenna.

- Copy and paste the antennae to a new vector layer.
- Perform the mirror and then rename it to left antennae.
- Move it back down to the layer with the original
antennae and align it as shown.

- Group the Antennae and rename group to Antennae.
- Now, arrange the antennae and leg groups as shown and group.
Name the group Ant.

- Rename the vector layer "Ant".
This will make things very nice when we save as a preset shape.
- To save your new ant as a preset shape,
File->Export->Shape.
- Be sure to save your image as a .psp or .pspimage file as well.
Just in case you need to correct something with the shape.
- For those wondering why you had to rename each ant part,
in PSP8, line, ellipse, vector, etc can cause PSP8 to think the shape
is a duplicate of another shape and not allow you access to that shape.
- To use and finish your ant: Open a new image. size is up to you.
- Add your preset shape ant to the new image.
- Hide all vector sublayers except the bottom one.
- Select that bottom group, Selections->promote to layer.
If you wish, you can add the following inner bevel:
the half round bevel shape, width=10, smoothness=0,
depth=16, ambience=1, shininess=34, light=white,
angle=266, intensity=50, elevation=58.
- Reveal the next sublayer and repeat the steps.
|

Click on the banner below to return to the Picnic!

Questions or comments?
Monica's TOU


All
web page graphics © 2003 Prestigious Dames
tutorial title graphic © 2003 Monica Wallek
All Rights Reserved
Unless otherwise stated, nothing on this page is
available for download.
|